
How to crochet a 4 Leaf Clover and a Mini-Irish Lad
- Karen Edwards

- Feb 26, 2021
- 6 min read
Updated: Mar 10, 2021
Superfast St. Patricks Day Patterns are here! Woo hoo! I love St. Patrick's day and don't know why ha ha! Anyone else? Ok, so maybe its because I am a redhead and all things Irish just seem to call my name! *insert should shrug emoji here* ha ha ha
*Anywho*... I've always been fascinated by all things Irish and Scottish and hopefully one day I will visit both of those places and find my long lost redheaded brothers and sisters lol.
Until that time I'll do what I can to enjoy the Irish culture from "Sweet Home Alabama," and that's why I wrote these two super-easy crochet patterns that can be worked up and duplicated easily!

The clovers look great on wreaths, signs, scarves, banners, pillows, and blankets! You can even add a little modge podge or another fabric stiffener to the back and let it dry to make a cute pin.
Once the stiffener is dry you can use hot glue or craft glue to add a pin to the back and this is an easy way to keep from getting pinched on St. Patricks Day ha ha!
Tester Kim Shaw used embroidery floss and a size 1 metal hook to make her clovers into earrings! I just love her idea and might have to try this myself this year!

The mini Irish Lad is also great for pins and embellishments on shirts, hats, and more! Tester Alma Harper made herself an Irish themed t-shirt with both the clover and Irish lad!

Before I share the instructions on how to crochet these two cutie patootie items I would like to let you know where you can get an ad-free downloadable/printable copy of the pattern if you need one!
You can find the pattern for both of these appliques under the title "Irish Pack" in both my Etsy and Ravelry Shop! Keep an eye out in the VIP group for a March sale too!
Here is how you crochet both of these appliques:
“Easy 4 Leaf Clover”
Crochet Pattern
Material:
Worsted Weight #4 - Green
Hook - G or 4mm
Needle
Scissors
Stitches:
Ch(s) - chain(s)
single crochet
Sl st - slip stitch
Sc - single crochet
Dc - double crochet
Hdc - half double crochet
St(s) - stitch(es)
#st - complete # number of sts in same space
St # - complete stitch in next # number of spaces
( ) - do all in the same stitch/space
Skill Level / Language - Beginner. If you are unsure of any stitches, Youtube is a great resource! American Standard Terms are used throughout the pattern.
Pattern Info - This clover is approximately 3.75 inches by 4 inches. Use it on garland, wreaths, blankets and more! You can go up or down in hook size to get a smaller or larger clover. You can also go up and down in yarn weights to get smaller or larger clovers.
Pattern Instructions
*beginning chains do not count as a st unless otherwise noted
*alternatively, you can begin with a ch 4 if you want a larger starting ring, see photos on next page for comparison
*see photos below the tips for further assistance
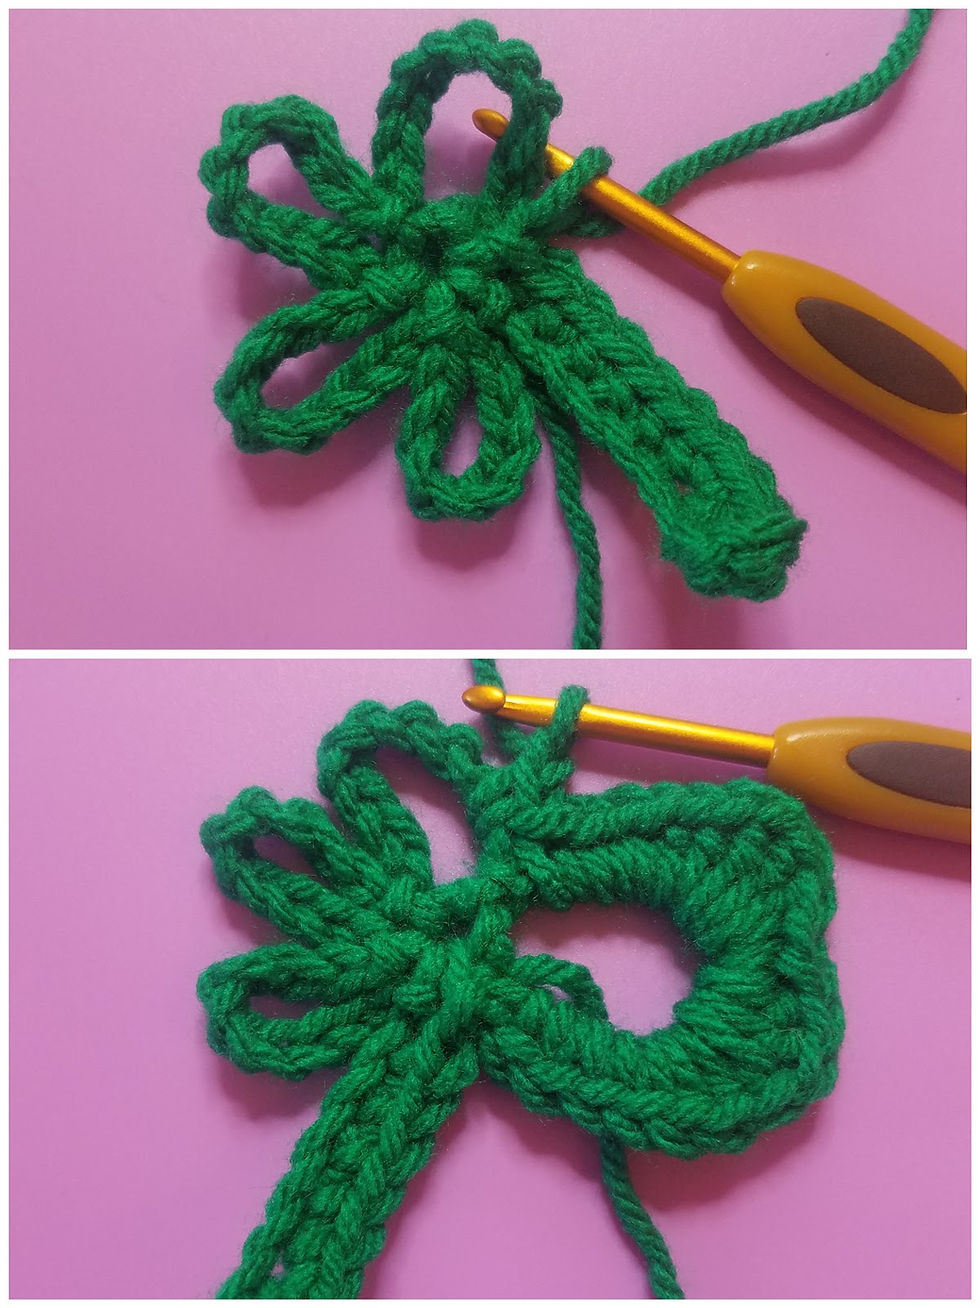
Begin: Ch 3, sl st to join into the 1st ch space to create a ch ring, *ch 10, sl st into ring*, repeat *to* 3 more times, ch 9. (4 ch loops and a ch 9)
Round 1: Dc in 2nd ch from the hook, hdc 2, 2sc, sc 4, sl st to join into the ring (stem completed) ch 1, sl st into 1st ch 10 loop, ch 1, *work the next series of stitches into the loop and not into the ch’s, (sc 4, hdc 2, dc 3, sc 3, dc 3, hdc 2, sc 4), sl st to join into next ch 10 loop (1st leaf completed), ch 1*, repeat *to* 2 more times, (sc 4, hdc 2, dc 3, sc 3, dc 3, hdc 2, sc 4), sl st to join into the beginning ch loop, fasten off. (4 leaves, 1 stem)
Tips:
If you run out of space for your stitches on each loop, just shove/push them closer together to get them to all fit . You can adjust their position once the whole clover is finished.
Once the clover is complete, massage/push/slide your stitches on the loops to adjust the shape of each leaf.

“Mini Irish Lad”
Crochet Pattern
Material:
Worsted Weight #4
Green
Lime
Orange
Cream
Hook - G or 4mm
Needle
Scissors
Hot glue/fabric glue *optional
Magnet or Pin Back *optional
Stitches:
Ch(s) - chain(s)
Sl st - slip stitch
Sc - single crochet
Hdc - half double crochet
Dc - double crochet
Tr - triple crochet
Hdc2tog - half double crochet two sts together
St(s) - stitch(es)
#st - complete # number of sts in same space
St # - complete stitch in next # number of spaces
Pattern Info - This lad is approximately 3 x 2.5 inches. Makes a great pin, magnet or applique! You can go up or down in hook sizes to change his size.
Pattern Instructions
*beginning chains do not count as a st unless otherwise noted
*leave long tails if sewing or weave in ends if gluing together
Body: Cream & Lime
Begin: With Cream, Ch 4
Row 1: Sc in 2nd ch from hook, hdc, sc, change colors to lime before finishing last stitch, ch 1. (3st)
Row 2: Turn, hdc 3, ch 1. (3st)
Row 3: Turn, hdc 3, first sleeve finished ch 6 to begin middle of shirt. (3st, ch 6)
Row 4: Turn, hdc in 2nd ch from hook, hdc next 4, hdc 3 connecting back to sleeve, ch 1. (8st)
Row 5 - 7: Turn, hdc 8, ch 1. (8st)
Row 8: Turn, sc 8, ch 1. (8st)
Row 9: Turn, hdc 3, ch 1. (3st)
Row 10: Turn, hdc 3, change colors to cream before finishing the last stitch, ch 1. (3st)
Row 11: Turn, sc, hdc, sc, fasten off. (3st)
Nose: Cream
Begin: MR, ch 1
Round 1: Hdc 5 in MR, pull tight to close, do not sl st to join, fasten off. (5st)
Beard: Orange
Begin: Ch 7
Row 1: Hdc in 2nd ch from hook, hdc 5, ch 1. (6st)
Row 2: Turn, hdc2tog, hdc 2, hdc2tog, ch 1. (4st)
Row 3: Turn, hdc2tog, hdc2tog, ch 1. (2st)
Row 4: Turn, hdc2tog, fasten off. (1st)
Hat: Green
Begin: Ch 3
Row 1: Hdc in 2nd ch from hook, hdc, ch 1. (2st)
Row 2: Turn, 2hdc, hdc, ch 1. (3st)
Row 3: Turn, hdc, 2hdc, hdc, ch 1. (4st)
Row 4: Turn, 2hdc, hdc 3, ch 1. (5st)
Row 5: Turn, 2hdc, hdc 3, 2hdc, ch 3. (7st)
Row 6: Turn, tr, dc, hdc, sc, hdc, dc, tr, fasten off. (7st)
Assembly
Note: I assemble my appliques with hot glue which is a fast and safe method. The glue adheres to the fibers quite well and the applique is very secure. The hot glue packaging that I use says non-toxic so it is safe in my opinion. In addition, you can machine wash on cold, and lay flat to dry or tumble dry/lowest heat setting. You may also use other fabric-safe glue or use the traditional method of sewing your pieces together.
How I assemble my Irish Lad:
I lay out all my pieces to get the look I want first. You can use pins to hold it together if you desire and/or take a picture of your layout with your phone to reference as you are putting it together.
First I laid the beard in the center of the shirt leaving about ¼ inch above the beard for the hat.
Then I placed my nose on top of the beard and last I attached the hat with the nose fitting in the curve at the bottom of the hat.
To finish you can add a magnet or a pin to the back of your gnome, or use him as an applique!
You can also add a tassle at the top of his hat if desired.

And Voila` you have two super cute St. Patricks Day appliques! I had a lot of fun crocheting these and I hope you did too! You definitely won't be getting pinched by anyone this St. Patricks day!
I would love to see what you do with these so please feel free to share photos in the comment section of this post or in the VIP Facebook Group!
If you enjoyed this pattern you might also enjoy the "Pot of Gold Rainbow" Applique Pattern! You can find it here!

Ever so often I do a random drawing for VIP's in the group when they share photos so if you like a chance at winning prizes this is a great place to share your photos!
Don't forget you can find the ad-free downloadable/printable pattern for both of these appliques under the title "Irish Pack" in both my Etsy and Ravelry Shop!
If you enjoyed these two patterns and do not want to miss out on more free patterns like these be sure to click here and subscribe to Orchid and Bee's! This way you will get email notifications with new FREE pattern alerts!
Thanks again for stopping by! I look forward to sharing another free pattern with you soon! I will leave you with this special Irish Blessing...

Blessings and Love,
Karen E.
Orchid and Bee's


Comments