
How to Crochet a Spring Bunny and Surprise Pattern
- Karen Edwards
- Apr 2, 2022
- 21 min read
Updated: Apr 4, 2022
If your kids are singing ♫♫♪ "here comes Peter Cottontail, hopping down the bunny trail..." or ♫♫♪ "little bunny foo foo hopping through the forest scooping up the field mice..." then it's a sure sign that it's Spring!

Bunny rabbits are popular this time of year, especially among those that celebrate Easter, and if you are looking for a super easy applique to add to a basket, blanket, dress, pillow, or banner then you have come to the right place.
With the right color combinations, this looks absolutely adorable on little dresses. Tester Stephanie R. from the Orchid and Bee's Testing Team shared this photo from her test results and was adding the applique to a little dress she had made for a sweet little girl.

It's absolutely adorable though, isn't it!?
If you are making this for a baby boy, you could swap out the pink for a lighter blue and it would be just as adorable for the little guy.
As always the pattern is super easy and uses basic stitches so you'll have no trouble getting this worked up. I'm sure.
To purchase an ad-free printable version you can find the Spring Bunny Pattern PDF in all three of my shops:
While I will be sharing this adorable bunny applique with you today, I also have a surprise for you! If you keep scrolling past the bunny crochet instructions you will find a bonus pattern!
I had a wild idea this week to design a basket. I had no plans for designing a basket this year but sometimes we artists get crazy ideas that we just have to do! ha ha... I could see it in my head so clearly that I went ahead and worked it up in one day's time (and in one go, without any corrections -- it was a miracle, lol)!
Thankfully, I have amazing testers and they jumped on it to test it for me on short notice, and now I am able to share it with you. Now, you will have plenty of time to try both patterns out for Easter! You can jump to the Basket pattern here or continue reading for the Spring Bunny Applique Instructions.
For the Spring Bunny Applique Pattern, here are the instructions:
“Spring Bunny”
Crochet Pattern Instructions
Material:
Worsted Weight #4
White
Color of choice for whiskers and nose
Pink
Green *optional for grass
Hook - G or 4mm & E or 3.5mm
Needle
Scissors
Hot glue or Fabric Glue *optional
Safety eyes:
2 - 9mm or 10mm
Or Size of choice
Note: This post contains affiliate links in which I may earn a small commission on for clicks and or purchases at no extra cost to you. This helps me provide the blog, website, and pattern free to you. Without your support, I could not provide these services and products! My family and I thank you!
Stitches:
Ch(s) - chain(s)
Sc - single crochet
Sl st - slip stitch
Dc - double crochet
Hdc - half double crochet
Sk - skip
St(s) - stitch(es)
Hdc2tog - hdc two stitches together
#st - complete # number of sts in same space
St # - complete stitch in next # number of spaces
( ) - work all in the same st space
* * - repeat instructions between asterisks
Skill Level / Language - Beginner. If you are unsure of any stitches, YouTube is a great resource! American Standard Terms are used throughout the pattern.
Pattern Info - The bunny without the grass is approximately 10 inches tall by about 4 to 5 inches wide depending on how you assemble yours. It is perfect on blankets, totes, pillows, wreaths, signs, banners and more! Enjoy!
Pattern Instructions
*beginning chains do not count as a st unless otherwise noted
*begin each st in the same space as the beginning chain on rounds
*leave long tail for sewing or weave in ends if gluing
Bunny Head: White - G Hook
Begin: MR, ch 1.
Round 1: Hdc 10 in MR, pull tight to close, sl st to join, ch 1. (10st)
Round 2: 2Hdc in each st around, sl st to join, ch 1. (20st)
Round 3: *Hdc, 2hdc*, repeat *to* around, sl st to join, ch 1. (30st)
Round 4: *Hdc 2, 2hdc*, repeat *to* around, sl st to join, ch 1. (40st)
Changing to rows, beginning first ear.
Row 5: Hdc 3, ch 1. (3st)
Row 6: Turn, hdc, 2hdc, hdc, ch 1. (4st)
Row 7: Turn, 2hdc, hdc 3, ch 1. (5st)
Row 8: Turn, 2hdc, hdc 4, ch 1. (6st)
Row 9: Turn, hdc 6, ch 1. (6st)
Row 10: Turn, 2hdc, hdc 5, ch 1. (7st)
Row 11: Turn, 2hdc, hdc 6, ch 1. (8st)
Row 12: Turn, hdc2tog, hdc 6, ch 1. (7st)
Row 13: Turn, hdc2tog, hdc 5, ch 1. (6st)
Row 14: Turn, hdc2tog, hdc 4, ch 1. (5st)
Row 15: Turn, hdc2tog, hdc, hdc2tog, ch 1. (3st)
Row 16: Turn, hdc2tog, hdc, ch 1. (2st)
Row 17: Turn, hdc2tog, fasten off. (1st) First ear complete
Second Bunny Ear: White - G Hook
Begin: Join new yarn in the 4th stitch from your first rabbit ear (leaving 3 unworked stitches between the ears), ch 1.
Row 1: Hdc in same space as join, hdc 2, ch 1. (3st)
Row 2: Turn, hdc, 2hdc, hdc, ch 1. (4st)
Row 3: Turn, 2hdc, hdc 3, ch 1. (5st)
Row 4: Turn, 2hdc, hdc 4, ch 1. (6st)
Row 5: Turn, hdc 6, ch 1. (6st)
Row 6: Turn, 2hdc, hdc 5, ch 1. (7st)
Row 7: Turn, 2hdc, hdc 6, ch 1. (8st)
Row 8: Turn, hdc2tog, hdc 6, ch 1. (7st)
Row 9: Turn, hdc2tog, hdc 5, ch 1. (6st)
Row 10: Turn, hdc2tog, hdc 4, ch 1. (5st)
Row 11: Turn, hdc2tog, hdc, hdc2tog, ch 1. (3st)
Row 12: Turn, hdc2tog, hdc, ch 1. (2st)
Row 13: Turn, hdc2tog, fasten off. (1st)
Inner Ears: Pink - G Hook - make 2
Begin: Ch 3
Row 1: Hdc in 2nd ch from hook, hdc, ch 1. (2st)
Row 2: Turn, 2hdc, hdc, ch 1. (3st)
Row 3: Turn, 2hdc, hdc 2, ch 1. (4st)
Row 4: Turn, 2hdc, hdc 3, ch 1. (5st)
Row 5: Turn, 2hdc, hdc 4, ch 1. (6st)
Row 6: Turn, hdc2tog, hdc 4, ch 1. (5st)
Row 7: Turn, hdc2tog, hdc, hdc2tog, ch 1. (3st)
Row 8: Turn, hdc2tog, hdc, ch 1. (2st)
Row 9: Turn, hdc2tog, fasten off. (1st)
Nose: Color of choice - G Hook or E if you want it smaller
Begin: MR, ch 1
Row 1: Sc, hdc, dc hdc, sc, pull tight to close, do not sl st to join, fasten off.
Whiskers: Color of choice - E Hook or smaller
Small Whiskers: Ch 4, fasten off. Make 4.
Large Whiskers: Ch 6, fasten off. Make 2.

Mouth: Color of choice - E Hook or smaller
Begin: Ch 10, fold in half. Either make a small stitch through the 5th and 6th chain to attach them together, or put a small dot of hot glue between them to secure. Curve the tails of the chain when attaching to make the mouth shape during assembly.
Note: further instructions are in the assembly section.

Eyes Option: Black - E 3.5mm hook or smaller
Note: If you do not want to use safety eyes you can follow these crochet instructions.
Note: if you want your eyes smaller go down a hook size and do 3 sc instead of 4 or you can embroider eyes on instead
Begin: MR, ch 1.
Round 1: Sc 4 in MR, pull tight to close, sl st to join, fasten off. (4st)
Note: if you would like to add small highlights to the eyes, cut a 6 inch piece of white yarn and with a needle put about a ¼ inch or smaller stitch in each eye towards the left upper side for a cute cartoon eye look.
Tummy: White - G Hook
Begin: MR, ch 1.
Round 1: Hdc 10 in MR, pull tight to close, sl st to join, ch 1. (10st)
Round 2: 2Hdc in each st around, sl st to join, ch 1. (20st)
Round 3: *Hdc, 2hdc*, repeat *to* around, sl st to join, ch 1. (30st)
Round 4: *Hdc 2, 2hdc*, repeat *to* around, sl st to join, ch 1. (40st)
Round 5: *Hdc 3, 2hdc*, repeat *to* around, sl st to join, ch 1. (50st)
Inner Tummy: Color of choice - G Hook
Begin: MR, ch 1.
Round 1: Hdc 10 in MR, pull tight to close, sl st to join, ch 1. (10st)
Round 2: 2Hdc in each st around, sl st to join, ch 1. (20st)
Round 3: *Hdc, 2hdc*, repeat *to* around, sl st to join, ch 1. (30st)
Note: Stop here if you want a smaller tummy
Round 4: Sc in each st around, sl st to join, fasten off. (30st)
Feet: White - G Hook - make 2
Begin: Ch 6
Row 1: Sc in 2nd ch from hook, hdc, 2dc, hdc, sc, heel bottom is made, continue around to unworked side of ch to begin the top of the foot, hdc 5, ch 1. (11st)
Row 2 - 3: Turn, hdc 5, ch 1. (5st)
Row 4: Turn, hdc 2, 2hdc, hdc 2, ch 1. (6st)
Row 5: Turn, hdc 6, ch 1. (6st)
Row 6: Turn, sc, (dc, ch 1, sl st), first toe made, (sl st, sc), (dc, ch 1, sl st), second toe made, (sl st, sc), (dc, ch 1, sl st), last toe made, fasten off. (3 toes)
Large Foot Pad: Pink - G Hook - make 2
Begin: MR, ch 1
Round 1: In MR, sc 4, hdc, dc 2, hdc, sc 4, hdc, dc 2, hdc, pull tight to close, sl st to join, fasten off. (16st)
Small Toe Pads: Pink - E 3.5mm Hook or smaller hook - make 6
Begin: MR, Ch 1
Round 1: Sc 3 in MR, pull tight to close, sl st to join, fasten off, you will have small little ball shapes. (3st)
Arms: White - G Hook - make 2
Begin: Ch 5
Row 1: Sc in the 2nd ch from the hook, dc 2, sc, elbow made, continue around to unworked side of the ch, hdc 4, ch 1. (4st)
Row 2 - 3: Turn, hdc 4, ch 1. (4st)
Row 4: Turn, hdc, hdc2tog, hdc, ch 2. (3st)
Row 5: Turn, dc, ch 2, (sl st, ch 2, dc), ch 2, (sl st, dc, ch 2, sl st), fasten off. (3 fingers)
Finish: Cut two 9 inch pieces of yarn (color of choice) to make small finger lines to accent the paws. With needle make three small stitches about ½ inch lines in each of the fingers from row 5 on each arm.
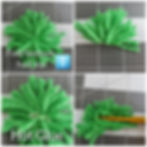
Optional Grass: Green - make as many as desired
With green, wrap yarn around three fingers, or a piece of 2 inch cardboard, approximately 9 times.
Cut and slide the loops off your fingers/cardboard.
Cut a 6 to 9 inch piece of yarn and tie it around the middle of the yarn you just slid off your fingers/cardboard. Wrap around a few more times if you want it a little more secure- if you are not using glue.

Cut through the loops on both sides.
Fold the bottom half up to the top half.
You can add glue in the middle where you tied it to add a little extra security or just use a needle and separate piece of yarn to sew through the bottom pieces to your project for extra security. If using hot glue, use your hook to mash it down onto the glue to keep from burning your fingers.
Assembly of applique
Note: I assemble my appliques with hot glue which is a fast and safe method. The glue adheres to the fibers quite well and the applique is very secure. The hot glue packaging that I use says non-toxic so it is safe in my opinion. In addition, you can machine wash on cold, and lay flat to dry or tumble dry/lowest heat setting. You may also use other fabric-safe glue or use the traditional method of sewing your pieces together.
How I assemble my Bunny Appliques:
I lay out all my pieces to get the look I want first. You can use pins to hold it together if you desire and/or take a picture of your layout with your phone to reference as you are putting it together.
I placed my inner ears in the center of each ear. Row 1 of the inner ear is the bottom and Row 8 is the top.
I placed my eyes between the 2nd and 3rd row of the face and left approximately 1 inch between the eyes (or approx 4 stitches).
The whiskers are attached approximately 1.5 inches apart on the 4th round about ½ inch below the eyes with the nose in the center.
I shaped my mouth and then attached it directly beneath the nose.

Next, I attached the inner tummy to the outer tummy.
I then assembled my feet by putting the large foot pads in the center of each foot and then put the toe pads on each toe space.
I attached the head and the feet and then the arms.
For the arms you can either place them on in a surprise type position with them spread open or you can “wrap” them on so he has them on his tummy. By wrapping, I mean, I attached the elbow section to the back edge of the outer tummy and then wrapped them around to the front and attached the hands/fingers to the inner tummy area.
To finish off your look you can attach your grass to your project around your bunny in various locations! Have fun and be creative!

If you would like to have just a “bunny butt,” you will use the outer tummy piece, the feet, and make a tail. To make the tail, repeat the grass instructions but do not fold. You will simply fluff and trim. You may want to wrap the yarn more times for a more fluffy look. Add grass for extra cuteness.

Ok now that your Spring Bunny is complete, let's get to the surprise pattern, Leya's Basket Pattern! You are going to love this pattern as it works up fast and easy!
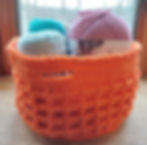
It works up beautifully in solid color yarn or variegated yarn! Tester Laura Francis of KETL Creations provided this beautiful photo and takes orders as well. So if you run out of time to make yours shoot her a message!

For these baskets there are two size options, and really there is three if you decide to do the small basket with two strands and a H 5mm hook.
The large basket is made with an H 5mm hook and two strands of worsted yarn. This makes the basket sturdy and is a lot easier to use without any added support. This basket is the perfect size for adding an applique. The Bunny head and the bunny butt work perfectly on this basket!

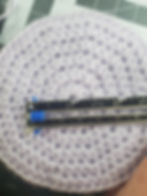
With this pattern you also have the option of which side you would like to use. That's right its reversible! As you can see below, the small basket shows the Waffle Stitch as you would traditionally see it. If you flip it inside out, it will have a "Rope" look to it as the larger basket is showing below.

My daughter was happy to test the basket out for me, and below you see she was able to collect about 18 Easter Eggs without the basket losing its shape! If you still prefer to add more support there is information on how to do so in the assembly instructions at the end of the pattern but I think you will find this to be a super sturdy basket compared to most.

The small basket is made with a G 4mm hook and a single strand of yarn. You can also work it with an H 5mm hook and two strands of yarn like the large basket if you would like. The two strands of yarn and the larger hook will make the small basket about 1 inch larger in diameter.
If you would like to make the small version of the basket with two strands tester Gina B. said that this is totally possible! She tried it out with the H 5mm hook and hers came out to 7 inches in diameter and 5 inches tall without the handle.

If you do not have any children to gift a basket to I had a couple of testers adapt theirs for personal use.
Tester Deborah A. is going to be making a set for all the different size plants she has. She set one of her plants in the finished version of the large basket she tested to show me her idea. Note: After Deborah shared her plant idea after testing the large basket, I added a note to the pattern explaining how to adjust the size of the project for different needs such as Deborah's.

Tester Ilene B. wanted to make something for her grown children and she added side handles. Feel free to join the VIP group to ask her how she made hers. In the future, I will add an option to the pattern but for now, you are welcome to customize it to suit your needs like she did.
She tried a variant out as well by using a M 8mm hook and a weight 6 yarn, single strand. It came out beautifully as you can see!
Regardless of which size you make, the key to both baskets having a good end result is to use tight tension. Whether it is one strand or two strands, having a tight tension with the waffle stitch provides really good infrastructure that will not need much-added support if any at all.
Because of the way the waffle stitch is created with offset stitches that are not perfectly flat like if you were just doing all single crochet stitches, it creates a "double-wall" effect. This "double wall" allows the sides to stand up on their own without added support.
There is one other feature that helps make this basket sturdy and that is the use of the "crab stitch." The crab stitch is used on the brim of the basket opening and on the sides of the handles.
The stitch looks much like a twisted rope, which makes a pretty finish, but also provides a lot of reinforcement to add to the sturdiness of the basket. I have included instructions on how to achieve this stitch.
To purchase an ad-free printable version you can find Leya's Basket Pattern PDF in all three of my shops:
In the instructions below you will find details on the size of the baskets, how to crochet the waffle stitch, and finishing options. I hope you enjoy this pattern as much as I did designing it!
Basket Pattern Instructions
“Leya’s Basket”
Crochet Pattern
Material:
Worsted Weight #4
Large Basket - Double Strand - approx. 570 yds - 650 yds for large basket
Small Basket
Single Strand - approx 130 - 200 yards - Double Strand - approx. 260 - 400 yards
Hook
Large Basket - H 5mm
Small Basket - G 4mm
Needle
Scissors
Hot glue *optional
Plastic Canvas Mesh *optional, see assembly instructions for more details
Stitches:
Ch(s) - chain(s)
Sl st - slip stitch
Dc - double crochet
Hdc - half double crochet
St(s) - stitch(es)
FPDC - front post double crochet
FPSC - front post single crochet
BLO - back loop only
CS - crab stitch *see special stitches
#st - complete # number of sts in same space
St # - complete stitch in next # number of spaces
( ) - work all in the same st space
* * - repeat instructions between asterisks
RS - right side (outside of basket)
WS - wrong side (inside of basket)
Special Stitches:
Waffle Stitch In the Round
For this pattern, the turning chain will NOT count as a stitch as it does in most versions of the waffle stitch. You will NOT begin each round by working the 1st st in the turning ch sp. Stitches will stack perfectly on top of one another to form the waffle look. Unlike the traditional waffle stitch where you work in Rows, this pattern will be worked in Rounds and you will turn your work for each Round after the 1st two foundation rounds are established for the sides. See example below.

Crab Stitch
This stitch feels unnatural at first because you are working the single crochet backwards (or left to right instead of right to left). Left handed crocheters will go from the right to the left. Take it slow and you will get the hang of it. Once the crab stitch is complete it will have a similar look to a corded rope. Its a beautiful texture and great for borders!
Insert hook to the right of your ch 1.
Yarn over, pull up a loop.
Yarn over, pull through two loops,
Insert hook to the next stitch to the right of the one you just completed. It will have a twisted look. If you miss a stitch that’s ok, just keep going! It feels strange to do this stitch but you can do it! Just keep going and take it slow!

Pattern Info:
Note: The Crab Stitch at the top of the main basket section and on the sides of the handle help make the basket more sturdy. It is not advisable to omit this stitch as it helps strengthen the baskets.
Large Basket
For the Large Basket, I used a double strand yarn with tight tension to make it more sturdy. The Large Basket is approx. 6 inches tall (not including the handle). The diameter is approx. 9 inches. The handle is approx. 22 inches long before sewing it into the inner sides of the basket. The handle will stand up without added support but still is able to collapse. You can add more support during the assembly process for both size baskets. More instructions and options can be found in the assembly steps.
Small Basket
For the Small Basket, I used a single strand of yarn with a tight tension. It is approx. 4 inches tall (not including the handle) and the diameter is approx. 5 inches. The handle is approx. 12 inches long before being attached to the inner sides of the basket.
Tester Gina B. said with an H 5mm hook and double strand hers came out to 7 inches in diameter and 5 inches tall without the handle. Picture of yellow basket is from Regina.

Reversible
This basket is reversible. You can select the side you like best before you attach the handle. If you like both sides then you can make the handle removable by using buttons or safety pins so that you can switch the basket sides around as you desire. The basket works well as a decorative item for things on your dresser or bathroom countertop. This basket is not just for kids, it works great for adult home decor as well!
Lining
If you would like to give your basket more structure and take its’ sturdiness to the next level, you can purchase some inexpensive plastic canvas mesh from your local craft store or Amazon. You can cut it to size and sew it, glue it, or even just place it in there leaving it removable. See assembly instructions for more details.
Note: when I googled it earlier (after I already bought mine at a "bougie" price - that's what impulse shopping and a lack of planning will do to you lol) Hobby Lobby had these on sale for .37 cents each! Be sure to search for sales in your area before paying a higher price like I did ha ha!

Gauge
The gauge is not critical but if you want it to be close to the exact listed sizes please see the gauge/swatch section for instructions.
Gauge / Swatch:
Large Basket -
Crochet Rounds 1 through 4 of the Large Basket (2 strands)
4 Rounds = 4 inches approx.

Small Basket -
Crochet Rounds 1 through 3 of the small basket (one strand only)
3 Rounds = 2 inches
Note: if you are doing the small basket with two strands and a H 5mm hook use the Large basket gauge info
Adjustments
If your swatch is larger you can go down a hook size, if it is smaller you can go up a hook size.
Alternatively, you can try adjusting your tension if a different hook size is not available.
Embellishing / Personalizing
Leather tags from Etsy sellers are a great way to personalize your basket with a child’s name or initials.
You can also add appliques like the bunny head or bunny butt from my Spring Bunny Pattern at the top of this post!
You could also use my alphabet pattern to add initials
Skill Level: Confident Beginner/Intermediate. If you are unsure of any stitches, Google and YouTube can help!
Language: For this pattern, American Standard Terms are used.
Crochet Pattern Instructions
*beginning chs do not count as a st unless otherwise noted
*note I use a ch 2 for my beginning/turning ch for DC sts, feel free to use a ch 3 if you prefer
*crochet with tight tension, this helps the structure of the basket be a little more sturdy
*in order to show the st details better the pictures in both the Large and Small Basket sections are shown using the single strand
Large Basket Instructions:
Note: The Waffle Stitch works in counts of 3. To make the basket(s) smaller you can stop on any round before Round 10 and add or subtract stitches to make it divisible by three. To make the basket(s) larger, add additional rounds after Round 9, before Round 10, simply make sure you add or subtract stitches to make it divisible by three.
Begin: With 2 strands of yarn, MR, ch 1.
Round 1: Hdc 10 in MR, pull tight to close, sl st to join, ch 1. (10st)
Round 2: 2Hdc in each st around, sl st to join, ch 1. (20st)
Round 3: *Hdc, 2hdc*, repeat *to* around, sl st to join, ch 1. (30st)
Round 4: *Hdc 2, 2hdc*, repeat *to* around, sl st to join, ch 1. (40st)
Round 5: *Hdc 3, 2hdc*, repeat *to* around, sl st to join, ch 1. (50st)
Round 6: *Hdc 4, 2hdc*, repeat *to* around, sl st to join, ch 1. (60st)
Round 7: *Hdc 5, 2hdc*, repeat *to* around, sl st to join, ch 1. (70st)
Round 8: *Hdc 6, 2hdc*, repeat *to* around, sl st to join, ch 1. (80st)
Round 9: *Hdc 7, 2hdc*, repeat *to* around, sl st to join, ch 2. (90st)
Note: bottom of the basket is made, next round begins the sides
Round 10: RS, BLO dc 90, sl st to join, ch 2. *see progress photo below

Round 11: RS, *FPDC, dc 2*, repeat *to* 29 more times, sl st to join, ch 2. (90st)

Note: make sure to work the first st of the next round in the last st of the prior round
Round 12: Turn, WS, *FPDC 2, dc*, repeat *to* 29 more times, sl st to join, ch 2. (90st)

Note: make sure to work the first FPDC of the next round in the last st of the prior round
Round 13: Turn, RS, *FPDC, dc 2*, repeat *to* 29 more times, sl st to join, ch 2. (90st)

Round 14 - 19: Repeat Rounds 12 & 13, ending Round 19 with a ch 1 instead of a ch 2. (90st)
Round 20: Turn, WS, *FPSC 2, sc*, repeat *to* 29 more times, sl st to join, ch 1. (90st)
Round 21: Turn, RS, CS 90, sl st to join, fasten off. (90st) *see special st info for assistance with crab stitch
Large Basket Handle:
Begin: With 2 strands of yarn, ch 71
Row 1: Hdc in the 2nd ch from the hook, hdc 69, ch 2. (70st)
Row 2: Turn, dc 70, ch 1. (70st)
Row 3: Turn, hdc 70, ch 1. (70st)
Row 4: CS 70, fasten off. (70st)
Note: in the next row you will be adding a row of crab stitches to the unworked side of Row 1; see special stitch info for further assistance
Row 5: Join a new piece of yarn on the unworked side of the ch, ch 1, CS 70, fasten off. (70st)
***See assembly instructions/options at the end the Small Basket Instructions below
Small Basket Instructions:
Begin: With 2 strands of yarn, MR, ch 1.
Round 1: Hdc 10 in MR, pull tight to close, sl st to join, ch 1. (10st)
Round 2: 2Hdc in each st around, sl st to join, ch 1. (20st)
Round 3: *Hdc, 2hdc*, repeat *to* around, sl st to join, ch 1. (30st)
Round 4: *Hdc 2, 2hdc*, repeat *to* around, sl st to join, ch 1. (40st)
Round 5: *Hdc 3, 2hdc*, repeat *to* around, sl st to join, ch 1. (50st)
Round 6: *Hdc 4, 2hdc*, repeat *to* around, sl st to join, ch 2. (60st)
Note: bottom of the basket is made, next round begins the sides
Round 7: RS, BLO dc 60, sl st to join, ch 2.
Round 8: RS, *FPDC, dc 2*, repeat *to* 19 more times, sl st to join, ch 2. (60st)
Note: make sure to work the first st of the next round in the last st of the prior round
Round 9: Turn, WS, *FPDC 2, dc*, repeat *to* 19 more times, sl st to join, ch 2. (60st)
Note: make sure to work the first FPDC of the next round in the last st of the prior round
Round 10: Turn, RS, *FPDC, dc 2*, repeat *to* 19 more times, sl st to join, ch 2. (60st)
Round 11 - 16: Repeat Rounds 9 and 10, ending round 16 with a ch 1 instead of a ch 2. (60st)
Round 17: Turn, WS, *FPSC 2, sc*, repeat *to* 19 more times, sl st to join, ch 1. (60st)
Round 18: Turn, RS, CS 60, sl st to join, fasten off. (60st) *see special st info for assistance with crab stitch
Small Basket Handle:
Begin: With 2 strands of yarn, ch 51
Row 1: Hdc in the 2nd ch from the hook, hdc 49, ch 2. (50st)
Row 2: Turn, dc 50, ch 1. (50st)
Row 3: Turn, hdc 50, ch 1. (50st)
Row 4: CS 50, fasten off. (50st)
Note: in the next row you will be adding a row of crab stitches to the unworked side of Row 1; see special stitch info for further assistance
Row 5: Join a new piece of yarn on the unworked side of the ch, ch 1, CS 50, fasten off. (50st)
Assembly of Basket(s)
You have a couple of choices for attaching the handle:
Choose which side of the basket that you want to face outward.
Fold the basket flat to find the middle of each side. Place a stitch marker on each edge to mark the place for your handles.
Fold your handles and match it up with your stitch markers. Sew the handles about two inches down to the inner sides of your basket.
Alternatively, you can use a button or safety pin to make the handle removable.

To add more structure you can use plastic canvas mesh from your local craft store. Cut it to fit the inside of your basket and handle. Sew or glue it in for extra support. Continue reading to the end for more instructions on how you can do this.
The double-strand basket is pretty sturdy. It held its’ shape well without extra support. However, you are welcome to use other options for giving it more support, such as cardboard, strong paper plates, plastic placemats from Dollar Tree, etc. The next photo shows my daughter using it. It had the faux grass in the bottom with approx. 18 eggs on top and it did not collapse.
To add plastic canvas mesh, you can measure and cut the plastic to fit your desired section widths, heights, etc. The mesh is extremely easy to cut. Once you’ve cut your pieces you can sew or glue the mesh to the sections where you would like more support. For the inside pieces, you can simply set them in there without sewing if you would like to remove them later.

I hope you enjoyed the surprise pattern! I had a lot of fun designing these for you and I hope they will bring a little joy to your Spring Celebrations!
I am thankful I got to share these patterns with you and before you go I have one more surprise for you! Post a picture of your finished projects in the Orchid and Bee's VIP group (with the hashtag #Bunnybutts) by midnight CST Sunday, April 17th, and I will do a drawing to win a Clover Crochet Hook from Orchid and Bee's!
Be sure to use the hashtag #Bunnybutts to be entered into the drawing. Without the hashtag in the post, I will not be able to find your post to include in the drawing.
I will do a LIVE drawing on Monday, April 18th so be sure post your photos along with the hashtag!

Thank you for visiting Orchid and Bee's today and for trying out both patterns! Rember, if you would like a copy of the ad-free versions of these pattern, you can purchase them from one of my three shops:
Leya's Basket Pattern:
Spring Bunny Pattern:
I hope you and your family have a wonderful month of April and that many blessings find you. On your way out, make sure you subscribe so you never miss a "New Pattern Notification!"
I look forward to seeing you next Saturday!
Blessings and Love to each of you,
Karen E.
Orchid and Bee's