
How to Crochet a Bushel of Apples - Fall Applique
- Karen Edwards
- Oct 2, 2021
- 7 min read
Updated: Apr 5, 2022
On September 22nd, this year, 2021, we celebrated the first day of Fall here in the United States, which is one of my favorite seasons. I LOVE the cool crisp air, the colors of the leaves, and being able to wear cute sweaters and jeans!
This also means putting up super cute Fall decorations, which is why today I want to share with you how to make my "Bushel of Apples" applique, and give you some ideas of how to decorate with it.

There are a few ways you can use this applique to decorate with minimal supplies. My first recommendation, if you are anything like me, is to hit up your local thrift stores and snatch up their craft supplies.
You would be surprised at what you can find in your thrift stores that can be used for crafting! Let me tell you a few sections to check out.
Of course, my first stop would be the arts and crafts aisle, but another great section to check is the household sections that include blankets, rugs, kitchen decor, and lastly, the hardware/outdoor section.
When you get to the household section of your thrift store, look for items such as blank rugs/mats. Even if they do not have any that are blank, check to see if it's something you can paint over like in the photo below. You can easily turn these into wall hangings.

I also recommend looking for burlap signs that people previously used on their porches or in their yards. You can totally upcycle those.
Don't worry if you see a little hot glue on any of the handmade signs. All you need to do is take a hairdryer to warm up the glue and it will peel right off. Now you can dress it up the way that you would like!
Definitely look for table runners and fabric. These would be easy to repurpose and give a new life to.
In the plumping/hardware section, I would look for any kind of rods, tubes, or metal that can be repurposed into a sign, painter's tape, cork rounds/squares, copper, vinyl letters, and even dowel rods.
While in the hardware section, I recommend also looking for old license plates that can be joined together, painted, and turned into a rustic sign.
Also, be sure to look for old picture frames and chicken wire. Jami at "An Oregon Cottage" has a great tutorial on how to make a chicken wire frame from a thrifted photo frame and wire.
Note: This post contains affiliate links from which I may earn a small commission for clicks and/or purchases at no extra cost to you. This helps me provide the blog, website, and pattern free to you. Without your support, I could not provide these services and products. My family and I thank you!
Thrift shopping is one of my favorite things to do but if you do not have time to get there, did you know there are online thrift shops? Here is a shop I recommend you check out. It is called "Make & Mend".
Founded by Emily Tirella, Make & Mend is a secondhand arts and crafts supply store to help people explore different types of art mediums in an affordable way! You definitely should check out her "About" section on her site. She is a wonderful young entrepreneur.
Make & Mend even has, you guessed it, YARN! Be sure to check out their sale section for some great deals!
You can totally let your mind run with creative possibilities while strolling down thrift store aisles, but if online shopping is more your speed, then you can definitely find supplies on Amazon and have it all shipped right to your door. Below are a few recommendations I have from Amazon.
You can use stencils to paint the word "Fall" on your burlap and then put your applique right below it. Attach a dowel rod to the back and then put a ribbon, string, or twine at the top and hang it up on a wall or your front door and boom, just like that you have a new super simple decor piece for your home!
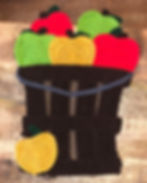
So you have gathered up your supplies to create you new fall piece for your home but now all you need is the "Bushel of Apples" Applique to put the finishing touch on! Here is how you create this applique!
“Bushel of Apples”
Crochet Pattern
Materials:
Yarn: Worsted Weight 4
Brown
Tan
Red
Green
Grey
Hook: H 5mm & G 4mm*if you would like your applique to be smaller you can go down in hook size
Needle
Hot glue or fabric glue
Scissors
Stitches:
Sc - single crochet
Sl st - slip stitch
Hdc - half double crochet
Dc - double crochet
Tr - treble crochet
* * - repeat *to* around
#st - complete # of sts in same space
St # - complete stitch in next number of space
Skill level / Language - Beginner: If you are unsure of any stitches, Youtube is a great resource. There are great tutorials on the different stitches and on crocheting in rounds. Written in American Standard Terms
Thank you - I appreciate your support! It means so much to me. It warms my heart to be able to bless children and families around the world with my “crochet art.” If you need anything, please reach out to me and I will be happy to help! You can find “Orchid & Bee’s” on Facebook, and Instagram. Also, be sure to join the VIP group for early access to patterns and get free exclusive patterns.
Pattern Info - This is an easy and fun pattern to complete! You can easily customize this with different colors, sizes, and shapes of apples. Add as many as you would like. Here is an idea of how to do different colors for your apples from Pattern Tester, Vanessa Strum.
Pattern Instructions
*beginning chains do not count as st
*leave long tails for sewing or weave in ends if hot gluing
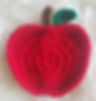
Apple - H hook - Red - make as many apples as desired varying the sizes by using either a G or H hook
Begin: MR
Round 1: Ch 1, 10hdc in MR, sl st to join, ch 1. (10st)
Round 2: 2Hdc in each around, sl st to join, ch 1. (20st)
Round 3: Hdc same st as ch, 2 hdc in next st, *1 hdc, 2 hdc* around, sl st to join, ch 1. (30st)
Round 4: Sc in same as ch, 2hdc, 2hdc, 2tr, 2dc, 2hdc, hdc 8, sl st 1, hdc 8, 2hdc, 2dc, 2tr, 2hdc, 2hdc, sc, sl st, sl to to join, ch 1. (40st)
Round 5: Sc, hdc, dc 2, 2dc, 2hdc, sc 11, hdc, sl st 3, hdc, sc 11, 2hdc, 2dc, dc 2, hdc, sc, sl st to join, fasten off. (44st)
Apple Stem - H hook - Brown
Begin: Ch 6
Row 1: Sc in 2nd ch from hook, 2sc, sc 3, fasten off. (6st)
Apple Leaf - H hook - Green
Begin: Ch 7
Row 1: Sc in 2nd ch from hook, hdc, 2dc, 2dc, hdc, sc, fasten off. (8st) Attach stem and leaf to back top center of apple by sewing or gluing.
Basket Vertical Panels - H hook - Make 4 Brown & 3 Tan
Begin: Ch 31
Row 1: Dc in 2nd ch from the hook, dc 29, ch 2. (30st)
Row 2 & 3: Turn, dc 30, ch 2, fasten off after last st of row 3. (30st)

Note: Depending on how wide you want your basket to be at the top you may need to add an extra row to your tan pieces if you want it wide at the top and more narrow at the bottom. Example from Tester Siccily Burrows in photos below


Basket Horizontal “Hoops” - H hook - Brown
Bottom Hoop
Begin: Ch 31
Row 1: Dc in 2nd ch from the hook, dc 29, ch 2. (30st)
Row 2 & 3: Turn, dc 30, ch 2, fasten off after last st of row 3. (30st)

Middle Hoop
Begin: Ch 41
Row 1: Dc in 2nd ch from the hook, dc 39, ch 2. (40st)
Row 2 & 3: Turn, dc 40, ch 2, fasten off after last st of row 3. (40st)
Top Hoop
Begin: Ch 56
Row 1: Hdc in 2nd ch from the hook, dc 54, ch 2. (55st)
Row 2 & 3: Turn, dc 55, ch 2, fasten off after last st of row 3. (55st)
Handle - G Hook - Grey
Begin: Ch 61
Row 1: Sl st in 2nd ch from hook, sl st 59, fasten off. (60st)
Assembly:
Note: I generally assemble my appliques with hot glue, which is a fast and safe method. The glue adheres to the fibers quite well and the applique is very secure. The hot glue packaging that I use says non-toxic so just be sure to check your packaging. In addition, you can machine wash on cold, and lay flat to dry or tumble dry/lowest heat setting. You may also use other fabric-safe glue or use the traditional method of sewing your pieces together.
How I assembled my bushel of apples:
I laid out all my pieces to get the look I wanted first. You can either pin things in place to keep their position or you can take a picture and reference it as you are gluing/sewing your piece together.
You can lay the panels slightly more angled to get a wider top and more narrow bottom. Once you get your vertical panels the way you like them, then lay your horizontal hoops on top, wrapping the middle and top pieces slightly around the back edges to give it a more rounded illusion.


After I finished the main basket section I attached my handle.
To assemble the apples I attached the stem and the leaf to the top (back) center of the apple and then layered them in the basket. There you have it a bushel of apples!!
Now that you have finished your applique, I am anxious to see what you do with it this fall! Please feel free to share photos in the comment section of this post or share them with me and with our other crochet sisters on Facebook.
I hope I have provoked some creative ideas in you today. I just know some of you are going to have some incredible ideas and finished pieces! We look forward to hearing about them!
Please make sure you subscribe to Orchid and Bee's so that you never miss out on a FREE pattern, announcement, contest, or crochet along!
Have a wonderful day and may this Fall season be a wonderful breath of fresh air for you!
Karen E.
Orchid and Bee's