
How to Crochet the North Star Blanket
- Karen Edwards

- Feb 12, 2020
- 18 min read
Updated: Mar 19, 2022

Update February 4th, 2022:
I have rewritten this pattern with a new increase formula for the blanket to lay perfectly flat as it gets to the larger sizes. Some people still prefer the old pattern for the baby size while some enjoy the new; so I have added the new version as an option to this blog post. To view the newest version of the pattern click here.
____________________________________
Have you been looking for a fresh new one-of-a-kind blanket design to crochet? I have noticed, that in a lot of the crochet groups, people have been asking for new ideas for baby blankets. They want it to be a quick, fun and unique design!
I think this just might be the answer that so many are looking for! It is definitely a fun, fast and easy pattern to work up and it has a unique, never before seen look to it!
The testers of this pattern definitely agreed and said it was a fast and easy pattern to work up! I know, as a designer, I finished this blanket in only 4 days!
Testers averaged a completion time between 16 and 20 hours! So, not too shabby for a blanket that averages in size from 30 to 44 inches depending on your yarn, technique, hook and what row you decide to end on!
It's noteworthy to say, that because the stitches change so often, you definitely do not get bored making this blanket! I hate being bored and I get bored quite easily! I will quit projects without hesitation (ha ha) but I zoomed through this pattern twice without getting bored once!
Even as a designer, if I find myself getting bored with a pattern I have designed, it usually doesn't get published; ha ha ha! Believe me, I have a drawer full of patterns I got bored with and didn't finish; lol! I am happy to report that no testers said they were bored with this pattern either!

Speaking of testers, just check out some of the amazing photos that were taken by the Orchid and Bee's VIP's Pattern Testers! Didn't they do a great job! They came out absolutely gorgeous!
I am in love with this Loops and Threads Impeccable Red Hot Blanket done by Julie Lee! It’s so vibrant and bold! Her young sons actually picked out this color and now she is working on one to make for them that will look like the Captain America Shield!

This blanket design works really well with solid colors and when the light hits it just right, you can't help but stare at it;ha ha! It is such a conversation piece! It's just so pretty!
We did find that variegated yarn does not work as well with this design as it makes the stitches disappear! So, I would not recommend trying that; lol.
In the next photo, by Margie Leverette, she added a scalloped border to hers! It has a nice rustic farmhouse charm to it doesn't it!

Tester Jessica W. found that while variegated yarns might not work as well with this pattern, ombre' certainly does work nicely. It highlights and shows off the unique stitches in each row.

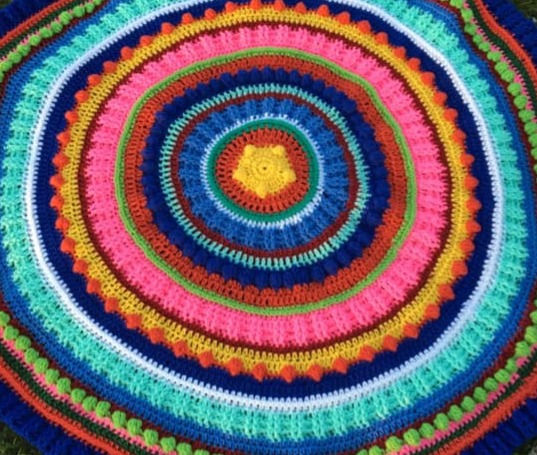
If you still find yourself wanting a little more color in your North Star Blanket, Orchid and Bee's VIP pattern tester S.B. did a super fun version of the pattern by changing the colors for each section of stitches! Doesn't this remind you of the inside of the giant jawbreakers we had when we were kids; ha ha! I love this so much!
So, how did I come up with this blanket! It was sort of an accident ha ha! I started off playing with my stitches and loved how the bobble stitch looked like a star in the center and then it reminded me of something...
The North Star, which is also known as Polaris. It is said that the North Star is the only star that seems to remain still and motionless in the sky. Many ancient people used the North Star for navigation. For centuries, it has been a useful star for direction and it is also the brightest in the sky.
Gee golly wiz lol, I was just so fascinated by this and decided to go for the gusto to design it with the influence of the North Star!
When photographers leave their camera lens open for long exposure times, all the stars seem to move in trails around the North Star and that is exactly how my stitches were inspired!

In an article by EarthSky.org, Ken Christison, captured these glorious star trails around Polaris, the North Star. Isn't it neat! If, by chance, you are a little bit of a secret nerd like me and want to read more about the North Star here are a few links where you can find out more!
If you haven't figured it out by now,the center of this blanket represents the North Star while the clusters, camel stitch and ribs represent the star trails that move around this central star.
This blanket is very mesmerizing and captivating. It seems to have a way of speaking to you and making you feel like everything is okay. Something about it just makes you feel calm and at ease and I pray that all those who rest up under it feel this same way!
My 5 yr old, Cataleya, absolutely loves and adores this blanket and I find her under it during movie time on the couch quite often! I love having it on me as well when I am sitting at the computer and even when I am watching a movie with the hubby!
I hope you enjoy this blanket pattern and that it becomes a blessing and an inspiration to all those that you make it for! I believe there is a special purpose, plan and destiny for every person on this earth and I hope this North Star blanket speaks to the destiny in each person who receives it!
I think you will find yourself falling in love with this pattern like members of the Orchid and Bee's VIP Pattern Testers group have and will want to have a hard copy on hand! When you do, you can find the ad-free PDF version in both my Ravelry and Etsy Shop!
In the meantime,here is the Free with- Ad version of the pattern! Enjoy!
Note: This post contains affiliate links in which I may earn a small commission on for clicks and or purchases at no extra cost to you. This helps me provide the blog, website, and pattern free to you. Without your support I could not provide these services and products and my family and I thank you!
“North Star Blanket”
Crochet Pattern
Material:
Special Info:
Project size ranges 30 to 44 inches based on your yarn of choice, crochet technique, hook, tension and which row you decide to end on, , etc. It is a blanket that is flexible and can be crocheted with any technique as well as lighter weight yarns like DK weight, sport, etc.
The fun thing about this blanket is you can stop at any row desired to achieve the size that tickles your fancy! The picture at the beginning of this post by Orchid and Bee’s shows it at about 38 inches.
Testers sizes ranged between 30 inches and 44 inches based on which row they chose to end at for their border. Some liked a thinner border and ended on a round like the simple hdc, while some liked ending on a round that gave it a thicker more textured border like the round that you use the fpdc/bpdc for 3 rounds to give it a ribbed look.
Testers tried various yarns and weights and you can see all of their notes in the PDF pattern in the Ravelry and Etsy Shop
Approx. project time was between 16 & 20 hrs (I completed it in 4 days but forgot to track my hours, but I crochet pretty quickly) *testers notes and their times can be found in the paid PDF version
Gauge - not needed, project is designed to work with any crochet tension/technique - I did use a slightly loose tension
Currently, this pattern only comes in the baby/lap blanket size, I am working on making larger options and will send out new files when ready and will update the blog to add larger sizing info.
My finished blanket weight approx. 560 to 600 grams
UPDATE: The PDF Pattern now includes instructions for working it all the way up to a King Size! It is currently on available on Etsy and Ravelry. 8/9/21
Stitches:
Ch - chain
Sc - single crochet
Sl st - slip stitch
Hdc - half double crochet
Dc - double crochet
FPDC - front post double crochet
BPDC - back post double crochet
BO - bobble stitch
* * - repeat *to* around
#st - complete # number of sts in same space
St # - complete stitch in next # number of spaces
Special Stitches
Camel Stitch - for this pattern, work a half double crochet st into the 3rd loop which is located on the back side, also known as the wrong side. For a video tutorial, I recommend following the one on Yarnspirations website: https://www.yarnspirations.com/how-to-video-rh-20141030-crochet-camel-stitch-technique.html
Bobble Stitch (BO)- for this pattern, you will join 6 double crochets into 1 puffy looking stitch. The sc stitches which surround it will make it pop out more. To achieve the Bobble Stitch, you will *yarn over, go through st, yarn over and pull through 2 loops*, do not finish st, repeat 5 more times, you will have 7 loops (6 half-finished double crochet stitches) on your hook, yarn over and pull through all 7 loops, do not chain to close cluster, immediately start the next st in the pattern. For more info on this stitch, see the photo tutorial and Yarnspirations definition here: https://www.yarnspirations.com/how-to-crochet-bobbles.html

Skill Level / Language - Beginner-Advanced/Intermediate. American Standard Terms are used throughout the pattern.
Thank you - I appreciate your business and your support means so much to me! If you need anything, please reach out to me and I will be happy to help! You can find “Orchid & Bee’s” on Facebook. Also feel free to join the VIP group for early access to patterns, participate in contests, CAL's, and giveaways as well as receive free exclusive patterns!
Pattern Instructions
*beginning chains do not count as a st
*first st of each round is worked in same space as ch (including rounds that begin with an increase)
*the right side/working side will always be facing you as you work, if your bobbles do not pop out towards you on the working side/right side, simply push the stubborn ones through to the right side with your finger
*in this pattern, there is a ch 1 before the hdc rounds, you can do a ch 2 if you prefer
Begin: Color of Choice MR
Round 1: 10 Hdc in MR, sl st to join, ch 1. (10st)
Round 2: 2 Hdc in each st around, sl st to join, ch 3. (20st)
Round 3: *Dc, 2dc*, repeat around, sl st to join, ch 1. (30st)
Note: see special stitch info above for bobble st in next round and all other bobble stitch rounds
Round 4: *Sc 5, BO*, repeat 4 more times, sl st to join, ch 3. (30st)
Round 5: *Dc 2, 2dc*, repeat 9 more times, sl st to join, ch 3. (40st)
Round 6: Dc 40, sl st to join, ch 1. (40st)
Round 7: 2Hdc in each st around, sl st to join, ch 1. (80st)
Note: The camel st in the next round and all other camel st rounds will be done with hdc
Round 8: Camel st in each st around, sl st to join, ch 3. (80st)
Round 9: 2Dc, dc, 2dc, dc, 2dc, *dc 3, 2dc*, repeat 17 more times, dc, 2dc, dc, sl st to join, ch 3. (102st)
Round 10: *FPDC 2, BPDC 2*, repeat around, FPDC last 2 sts, sl st to join, ch 3. (102st)
Round 11: Repeat round 10, sl st to join, ch 1. (102st)
Round 12: Hdc 102, sl st to join, ch 3. (102st)
Round 13: Dc 102, sl st to join, ch 3. (102st)
Round 14: *Dc, 2dc*, sl st to join, ch 1. (153st)
Round 15: *Sc 2, BO*, repeat around, sl st to join, ch 1. (153st)
Round 16: Hdc 153, sl st to join, ch 3. (153st)
Round 17: Dc 153, sl st to join, ch 1. (153st)
Round 18: *Hdc 2, 2hdc*, repeat around, sl st to join, ch 1. (204st)
Round 19: Camel st in each st around, sl st to join, ch 3. (204st)
Round 20: Dc 204, sl st to join, ch 3. (204st)
Round 21: *FPDC 2, BPDC 2*, repeat around, sl st to join, ch 3. (204st)
Round 22: Repeat round 21, sl st to join, and then ch 1. (204st)
Round 23: Hdc 204, sl st to join, ch 1. (204st)
Round 24: Repeat round 23, sl st to join, ch 3. (204st)
Round 25: *Dc 3, 2dc*, repeat around, sl st to join, ch 1. (255st)
Round 26: *Sc 4, BO*, repeat around, sl st to join, ch 1. (255st)
Round 27: Hdc 255, sl st to join, ch 3. (255st)
Round 28: Dc 255, sl st to join, ch 1. (255st)
Round 29: Hdc 255, sl st to join, ch 1. (255st)
Round 30: Camel st in each st around, sl st to join, ch 3. (255st)
Round 31: *Dc 4, 2dc*, repeat around, sl st to join, ch 3. (306st)
Round 32: *FPDC 2, BPDC 2*, repeat around, FPDC in the last 2 sts, sl st to join, ch 3. (306st)
Round 33: Repeat round 32, sl st to join, ch 1. (306st)
Round 34: Hdc 306, sl st to join, ch 1. (306st)
Round 35: Repeat round 34, sl st to join and then ch 3. (306st)
Round 36: *Dc 5, 2dc*, repeat around, ch 1. (357st)
Round 37: *Sc 2, BO*, repeat around, sl st to join, ch 1. (357st)
Round 38: Hdc 357, sl st to join, ch 3. (357st)
Round 39: Dc 357, sl st to join, ch 1. (357st)
Round 40: Hdc 357, sl st to join, ch 1. (357st)
Round 41: Camel st in each st around, sl st to join, ch 3. (357st)
Round 42: *Dc 2, 2dc*, repeat around, sl st to join, ch 3. (476st)
Round 43: *FPDC 2, BPDC 2*, repeat around, sl st to join, ch 3. (476st)
Round 44: Repeat round 43, sl st to join, ch 1. (476st)
Round 45: Hdc 476, sl st to join, fasten off, weave in ends. (476st)
Note: If you would like to add a fancier touch to your Border you can add a round of Crab Stitches or other st of choice.
And Ta-Da! you are all done!!! I hope you had as much fun making it and falling in love with it as myself and so many others have!
Just remember, if you find yourself wanting a copy of the ad-free PDF version, that also has additional photos and testers notes, you can find it in both my Ravelry and Etsy Shop!
And, I have a special treat for those reading this post that wanting a copy of the PDF!
For all blog follower fans, you can get the pattern for 25% off through March 1st, 2020! Use the code "BLOGFANS" on both Ravelry and Etsy to get the North Star Blanket at this special discounted price just for you!
I am so glad you tried out this pattern and I hope that you will visit us in the Orchid and Bee's VIP group to show off your blankets and share your stories! Also, if you never want to miss out on great patterns like this in my Blog, be sure to subscribe by visiting the homepage, www.orchidandbees.com. By clicking subscribe, you will get a notification when a new pattern has been added!
Before I let you go, I just wanted to also share with you that on February 17th - 22nd (2020) we will be doing a FREE Mystery CAL (crochet along) in the Orchid and Bee's VIP group!
Once you reach our group go to the events tab to join us and to see the schedule!
It is a quick and easy mystery pattern that will take no more than three 20 minute sessions to crochet, so don't worry if you have time constraints! Wait a minute, what's in it for you besides the fun you say?! Well.....
All participants in the Mystery CAL will win the PDF of the mystery pattern automatically by sharing their CAL WIP photos and will also get an additional FREE pattern code to grab another pattern out of the Ravelry shop when we complete the project!
There will also be a "Surprise Prize" for the person who guesses closest to the exact name of the Mystery Pattern! Yay!
Doesn't this sound like fun?! It does to me! I am already having so much fun dropping clues each day leading up to the start of the CAL and the members are having a blast trying to figure out what it could be and making unlimited guesses to try and win the "surprise prize".
We hope to see you there! Well, I am sure I talked your ears off enough and I need to let you go! So that's all I have for you today folks! Thanks again for visiting Orchid and Bee's and have a blessed day!
Blessings to you,
Karen E.
_________________________________________________________________________________
Updated Version of the North Star Blanket:
So I bet you are wondering what is different in the newest version of the North Star Blanket Pattern and I am excited to tell you!
In the newest version, I have added a yardage chart to help you know how much yarn to use!
I have also added more photos to help with special stitch explanations!
A different hook size is used in combination with the new pattern instructions to help it lay flat!
Speaking of new pattern instructions, I found a new increase formula that works perfect with this blanket to keep it from rippling and to help it lay perfectly flat!
I also changed the way the Bobble Stitch gets made and defined by adding a turn so that they are more pronounced on the top side of the blanket! Plus this way you don't have to worry about poking them through if you were having that problem... this way they automatically get made on the opposite side that you are working on.
Now in the pattern, there is a right side and a wrong side to help you make sure you get the stitches in the right place every time!
I think that just about covers all the changes and even if I missed one you'll see it in the instructions below!
Here is how to make the updated version of the North Star Blanket and oh by the way check out how it looks in ombre! Pretty right?!

Note: Instructions below will still be for the Baby Size Only. For up to the King Size you can get a copy of the PDF from my Website Shop, Etsy Shop, or Ravelry Shop.
“North Star Blanket”
Crochet Pattern
Material:
Color of choice - worsted weight #4
Yarn I used for baby size 38 - 40 inches:
Red Heart Super Saver
Ombre Deep Teal
#4weight - 10 oz/283g/482 yrds/440m per skein
I used approx. 2 and ¼ skeins
Yardage Estimates

Hook - J 6mm
Needle
Stitch Markers *optional if needed
Scissors
Skill Level / Language - Confident Beginner / Intermediate. American Standard Terms are used throughout the pattern.
Special Info:
You can stop at any row desired to achieve the size you desire. The picture by Orchid and Bee’s shows it at 38 inches with a J hook & a semi-loose tension
Gauge - not needed, project designed to work with any crochet tension/technique
To give the blanket a nice relaxed finish, wash on gentle in cold water, dry on low heat with dryer sheet and it will be soft and relaxed.
Stitches:
Ch - chain
MR - magic ring
Sc - single crochet
Sl st - slip stitch
Hdc - half double crochet
Dc - double crochet
FPDC - front post double crochet
BPDC - back post double crochet
BO - bobble stitch *see pg 3
* * - repeat *to* around
#st - complete # number of sts in same space, aka inc (increase)
St # - complete stitch in next # number of spaces
CS - Camel Stitch *see pg 3
WS - wrong side
RS - right side
Special Stitches
Camel Stitch - for this pattern, work a half double crochet stitch into the 3rd loop which is located on the backside, also known as the wrong side. See photo on next page for visual assistance. For a video tutorial, I recommend following the one on Yarnspirations website: https://www.yarnspirations.com/how-to-video-rh-20141030-crochet-camel-stitch-technique.html

Bobble Stitch (BO)- for this pattern, you will join 6 double crochets into 1 puffy-looking stitch. The sc stitches which surround it will make it pop out more. To achieve the Bobble Stitch, you will *yarn over, go through st, yarn over and pull through 2 loops*, do not finish st, repeat 5 more times, you will have 7 loops (6 half-finished double crochet stitches) on your hook, yarn over and pull through all 7 loops, do not chain to close the cluster, immediately start the next st in the pattern.
Your bobble stitch round will be worked on the wrong side of your work and the Bobble will puff out on the opposite side. You will turn your work back to the right side for the next round and your bobbles will now be facing you. For more info on this stitch see the photo tutorial and Yarnspirations definition at end of the pattern. https://www.yarnspirations.com/how-to-crochet-bobbles.html

Pattern Instructions
*beginning chains do not count as a st
*first st of each round is worked in same space as ch (including rounds that begin with an increase)
*in this pattern, there is a ch 1 before the hdc rounds, you can do a ch 2 if you prefer; I also use a ch 2 for the dc rounds but you can use a ch 3 if desired
*the Right Side of your work will have the bobbles and ribs showing

* each round increases by 12 with the exception of the Bobble St rounds, the FPDC2/BPDC2 rounds, and the border round
*on Bobble St rounds you can do any combination of Bobble Stitches to get the look you want. Feel free to add or subtract Bobbles!
*remember you can stop at any row you want to reach your desired size and look
*sl st to join to the top of the first st of rnd
Blanket: Color of Choice
Begin: MR, ch 1
Round 1: 12 Hdc in MR, sl st to join, ch 1. (12st)
Round 2: 2Hdc in each st around, sl st to join, ch 2. (24st)
Round 3: *Dc, 2dc*, repeat around, sl st to join, ch 1. (36st)
Note: see special stitch info for bobble st in next round and all other bobble stitch rounds; bobble stitch should pop out on the opposite side of your work
Round 4: Turn to WS, beginning ch will count as a st for this round only, *BO, sc 6*, repeat around, sl st to join to the ch 1, ch 2. (5BO’s, 31sts)
Round 5: Turn to RS, *Dc, 2dc, Dc*, repeat around, sl st to join, ch 2. (48st)
Round 6: *Dc 3, 2dc*, repeat *to* around, sl st to join, ch 1. (60st)
Round 7:*Hdc 2, 2hdc, hdc 2*, repeat *to* around, sl st to join, ch 1. (72st)
Note: The camel st in the next round and all other camel st rounds will be done with hdc sts
Round 8: *CS 5, 2CS*, repeat *to* around, sl st to join, ch 2. (84st)
Round 9: *Dc 3, 2dc, dc 3*, repeat *to* around, sl st to join, ch 2. (96st)
Round 10: *FPDC 2, BPDC 2*, repeat around, sl st to join, ch 2. (96st)
Round 11: Repeat round 10, sl st to join, ch 1. (96st)
Round 12: *Hdc 7, 2hdc*, repeat *to* around, sl st to join, ch 2. (108st)
Round 13: *Dc 4, 2dc, Dc 4*, repeat *to* around, sl st to join, ch 2. (120st)
Round 14: *Dc 9, 2dc*, repeat *to* around, sl st to join, ch 1. (132st)
Round 15: Turn to WS, *Sc 3, BO*, repeat *to* around, sl st to join, ch 1. (132st)
Round 16: Turn to RS, *hdc 5, 2hdc, hdc 5* repeat *to* around, sl st to join, ch 2. (144st)
Round 17: *Dc 11, 2dc*, repeat *to* around, sl st to join, ch 1. (156st)
Round 18: *Hdc 6, 2hdc, hdc 6*, repeat *to* around, sl st to join, ch 1. (168st)
Round 19: *CS 13, 2CS*, repeat *to* around, sl st to join, ch 2. (180st)
Round 20: *Dc 7, 2dc, dc 7*, repeat *to* around, sl st to join, ch 2. (192st)
Round 21: *FPDC 2, BPDC 2*, repeat *to* around, sl st to join, ch 2. (192st)
Round 22: Repeat round 21, sl st to join, and then ch 1. (192st)
Round 23: *Hdc 15, 2hdc*, repeat *to* around, sl st to join, ch 1. (204st)
Round 24: *Hdc 8, 2hdc, hdc 8*, repeat *to* around, sl st to join, ch 2. (216st)
Round 25: *Dc 17, 2dc*, repeat *to* around, sl st to join, ch 1. (228st)
Round 26: Turn to WS, *Sc 3, BO*, repeat *to* around, sl st to join, ch 1. (228st)
Round 27: Turn to RS, *hdc 9, 2hdc, hdc 9*, repeat *to* around, sl st to join, ch 2. (240st)
Round 28: *Dc 19, 2dc*, repeat *to* around, sl st to join, ch 1. (252st)
Round 29: *Hdc 10, 2hdc, hdc 10*, repeat *to* around, sl st to join, ch 1. (264st)
Round 30: *CS 21, 2CS*, repeat *to* around, sl st to join, ch 2. (276st)
Round 31: *Dc 11, 2dc, dc 11*, repeat *to* around, sl st to join, ch 2. (288st)
Round 32: *FPDC 2, BPDC 2*, repeat *to* around, sl st to join, ch 2. (288st)
Round 33: Repeat round 32, sl st to join, ch 1. (288st)
Round 34: *Hdc 23, 2hdc*, repeat *to* around, sl st to join, ch 1. (300st)
Round 35: *Hdc 12, 2hdc, hdc 12*, repeat *to* around, sl st to join, ch 2. (312st)
Round 36: *Dc 25, 2dc*, repeat *to* around, sl st to join, ch 1. (324st)
Round 37: Turn to WS, *Sc 3, BO*, repeat *to* around, sl st to join, ch 1. (324st)
Round 38: Turn to RS, *Hdc 13, 2hdc, hdc 13* repeat *to* around, sl st to join, ch 2. (336st)
Round 39: *Dc 27, 2dc*, repeat *to* around, sl st to join, ch 1. (348st)
Round 40: *Hdc 14, 2hdc, hdc 14*, repeat *to* around, sl st to join, ch 1. (360st)
Round 41: *CS 29, 2CS*, repeat *to* around, sl st to join, ch 2. (372st)
Round 42: *Dc 15, 2dc, Dc 15*, repeat *to* around, sl st to join, ch 2. (384st)
Round 43: *FPDC 2, BPDC 2*, repeat *to* around, sl st to join, ch 2. (384st)
Round 44: Repeat round 43, sl st to join, ch 1. (384st)
Round 45: Hdc in each st around, sl st to join, fasten off, weave in ends if stopping here for baby blanket size approximately 38 inches +/-. (384st)
Note: If ending on any of the HDC rounds a great option is to add a border such as the crab stitch.
I hope you enjoy the new version as much as the old but now you have two options! Real quick before I go I would like to show you a few photos from members in my VIP group!
A couple of them did some really fun things with their blankets that I thought you might like to see!
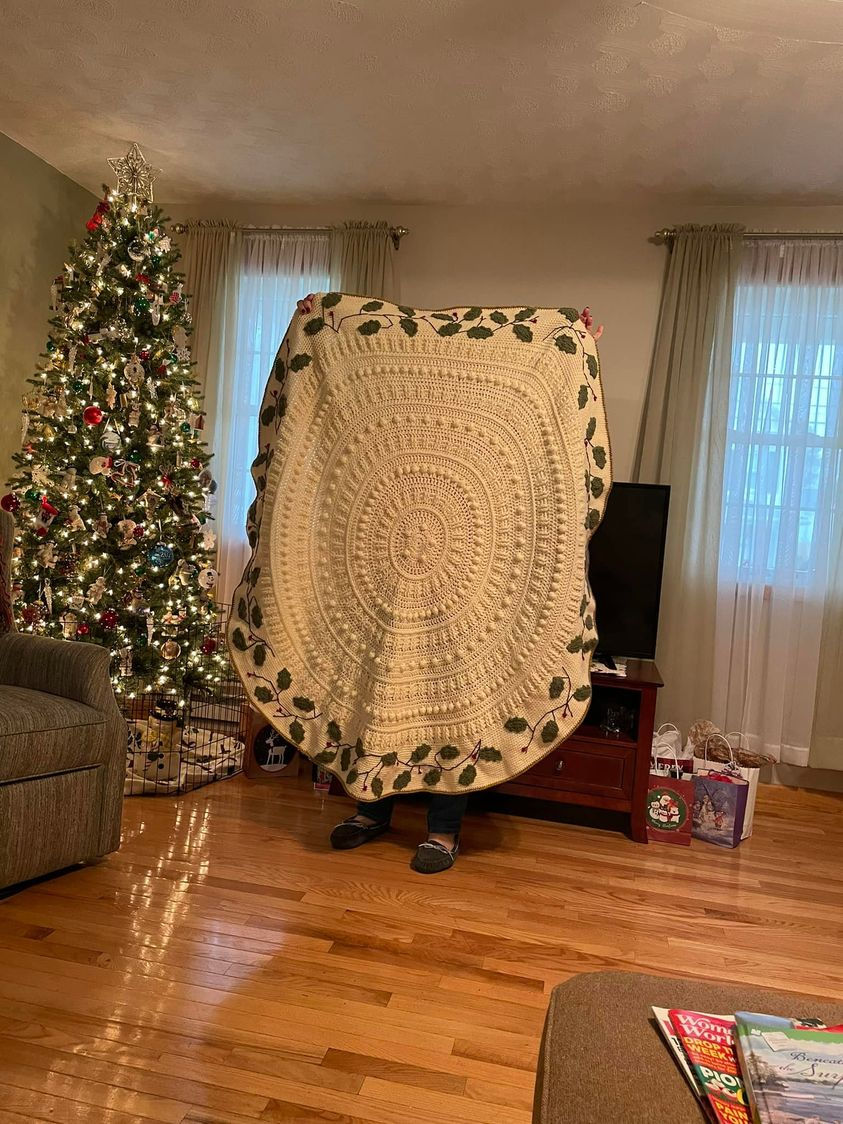
VIP Member, Stephanie R. shared photo that she made for Christmas in 2021. She added a border to her to give it a special holiday touch! She said that she used appliques to give it that Christmas Spirit! She used the old version of the North Star Pattern and did not have problems with the rippling by going up a hook size.
VIP Member, Maria R. shared this photo of the Old version of the North Star Blanket that she made with the ruffles/ripples. Her granddaughter wanted it this way and loved it! I think it looks gorgeous!
I am thinking I might offer a "Ruffled North Star Blanket" version because some people really like the ruffles so stay be sure to keep an eye on my shops for an option, as the new pattern is meant to lay perfectly flat only!

Sherry K. tested the new version of the pattern and this is a photo of how flat it lays now! It works great as a blanket and a rug! Her bobbles on on the "white" rounds so its hard to see in a photo but looks fabulous in person!

As you can see there's lots of great things you can do with this pattern!
Well that is all for the updates! I hope you enjoy either version of the blanket! Thanks again for stopping by! Don't forget to subscribe so you never miss out on a Free Pattern from the blog or any of fun announcements!
Also, be sure to sign up for a free membership to get access to special pattern downloads that are free to members! There will be other fun member benefits along the way!
Have a great day!
Blessings again,
Karen E. (aka Sonshine)
Orchid and Bee's


Great pattern, thanks so much! My 4 year-old has been asking for a lap blanket for story time and this is just perfect!
I had a skein each of red heart cherry red and bright yellow laying around and did the old pattern again (will try the new one next time.) This is definitely the most beautiful blanket I've made yet. By the fourth row of bobbles, I was running out of yarn, so I freestyled the edging: I substituted a round of single-crochet/x-stitch-double-crochet for the bobbles, continued the pattern in red, and where the next yellow camel stripe would have been, I hemmed it up with an alternating slip stitch in both colors.
Elisabeth Aylward, Ive tried a rectangle version several times and it doesnt work well because this it all worked face up without turning...it just doesn't achieve the same effect... . the turns changes things a lot and make it look strange lol... its crazy how little small things affect a pattern so much!
Beautiful Shay Taylor! I love your colors! What yarn did you use?!
Second time making this pattern! The first time I gifted without taking a pic first.